Shopify OAuth Flow for Dummies
This post should really be titled “Shopify OAuth for Dummies (and Everyone Else, even Experienced Developers Like Myself Who Forget This Stuff All the Time)”, but that’s not quite as catchy. Point is, even if you’ve been developing Shopify apps for a while it’s quite easy to forget how OAuth authentication works under the hood – and if you’re new to Shopify development, explanations given elsewhere can be tricky to follow.
The goal of this post is to provide a simple description of how Shopify’s OAuth authentication flow works. We won’t be getting into too many technical or implementation details. For lower-level stuff, start with the Shopify OAuth page. For the super-technically minded, dive in to the source code of one of the libraries on GitHub dealing with Shopify and OAuth (some examples are shopify_app, omniauth-shopify-oauth2, or django-shopify-auth).
Motivation
Here’s the high-level view as to why we need to use OAuth for Shopify apps:
- We’d like our application to make Shopify API calls on behalf of store owners, in order to make it somewhat more useful than a bag of rocks;
- We don’t want to ask the user for their Shopify admin username and password, or for some Private App credentials, as that’s quite insecure, grants us more power than we need, and makes us responsible for storing very sensitive information.
We’re therefore going to use OAuth, an industry standard flow, to obtain an access token that we can send along with our API requests to let Shopify know that the store owner has authorised us to make calls on their behalf. The token we get is tied exclusively to our app and the Shopify store in question, and can easily be revoked and regenerated as needed without too much fuss.
The Shopify OAuth Flow
There are five key steps in the OAuth flow, four of which are the responsibility of our application and one (Step 3) that is managed by Shopify.
- The Login
- The Permission Redirect
- The Authorisation Page (handled by Shopify)
- The Finalisation
- The Store & Call
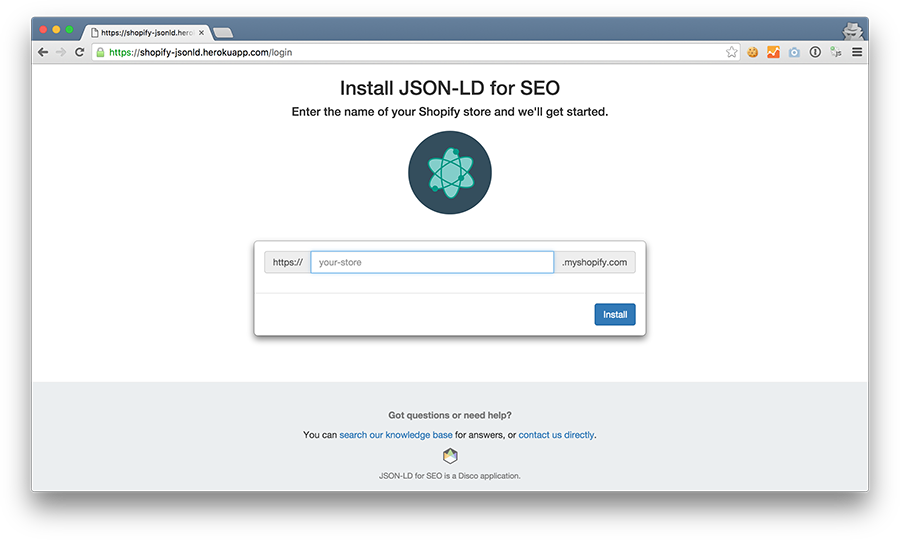
1. The Login
When a store owner accesses our app for the very first time, we know absolutely nothing about them. To get started with our authentication and installation process, we need to know their store name:

When the store owner enters their store and submits the form, we move to Step 2.
2. The Permission Redirect
Now that our app knows the name of the store requesting permission, we can combine that information with some other details to build a permission URL. This URL looks something like this:
https://mystore.myshopify.com/admin/oauth/authorize?client_id=fe0710b263922ec2a5
ec206dbd8cf7ac&redirect_uri=https%3A%2F%2Fmyapp.com%2Fauth%2Fshopify%2Fcallback&
response_type=code&scope=write_script_tags%2Cwrite_themes&state=24abdb4a773b68d5
9d0e6b95355b4eceb2d9af80e12209fb
The parameters here are:
client_id: Our app’s API key, which lets Shopify identify which app is requesting access to the store in question;redirect_uri: Where Shopify will send the user after they have approved or declined the application’s permission request. This URL needs to be whitelisted in your application’s settings page from the Partner dashboard;response_type: This will always be “code”;scope: A list of permissions that we’d like our application to be granted. In the example URL above, we’ve requested that our app be able towrite_script_tagsandwrite_themes. The Shopify API docs provide a full list of possible scopes;state: A random value that our app should create for every permission URL we generate. Our app needs to check this value during Step 4.
Once we’ve generated the permission URL, we redirect the store owner’s browser to it. This takes them to Step 3, the authorisation page, which is completely managed by Shopify.
While the creation of these permission URLs may seem a bit tricky, chances are good that you’ll be able to leverage an existing library to do this for you.
If you’re building a Ruby on Rails application on top of Shopify’s
shopify_app gem, this permission URL will be built for you automatically by
the omniauth library. Similarly, if using the official
shopify_python_api client you’ll have access to a
shopify.Session.create_permission_url method.
While there’s no official PHP Shopify library, you are able to leverage OAuth packages such as socialite (for Laravel) or opauth (for Symfony or CodeIgniter) to avoid writing a lot of this stuff yourself.
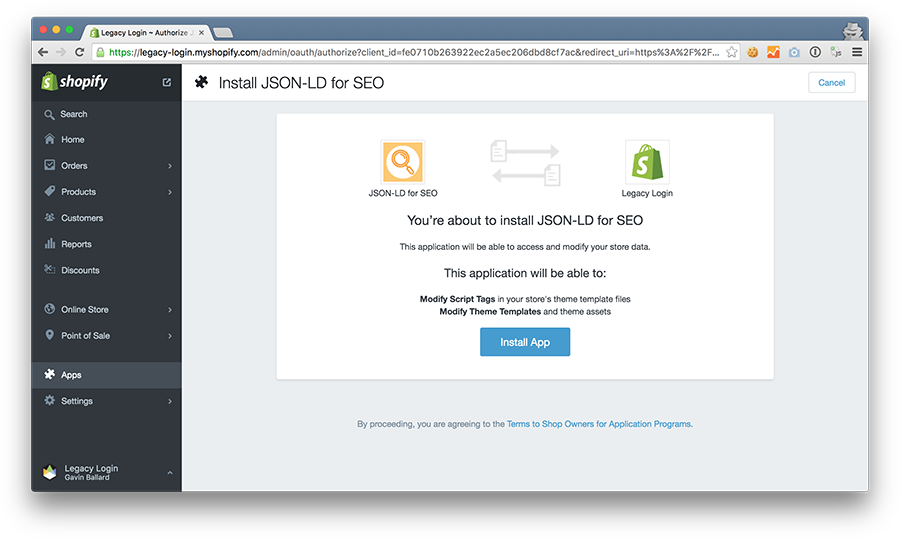
3. The Authorisation Page
I love this step, because we don’t have to do anything - it’s all on Shopify. As you may have noticed, the permission URL we generated at Step 2 points to a page inside the store owner’s admin:

All that’s left is for the store owner to click “Install App”. Once they do
that, Shopify will redirect them to the redirect_uri we provided when
generating our permission URL at Step 2, and we move on to Step 4.
4. The Finalisation
When Shopify redirects the store owner to our redirect_uri, they pass along
a couple of extra parameters in the URL, like this:
https://myapp.com/auth/shopify/callback?code=f277ec9ac6f64&hmac=da9d83c171400a41
f8db91a950508985×tamp=1409617544&state=24abdb4a773b68d59d0e6b95355b4eceb2d9
af80e12209fb&shop=mystore.myshopify.com
code: An authorisation code, which your app can use to obtain a final access token;hmac: A “Hash-based Message Authentication Code”, used for verification;state: This should be the same as the originalstateparameter you provided in the permission URL at Step 2;shop: The shop that is being authenticated.
There are two parts to what your app needs to perform in this step.
First, your app needs to verify the request – you want to make sure that it
did in fact come from Shopify, and not some malicious third party. The method
used to do this is described in the Shopify documentation and makes use of
the hmac, state and shop parameters.
If everything checks out, our app can then make a POST request to Shopify to
exchange our temporary code value for a permanent access token.
5. The Store & Call
Our application should receive something like this in response to the POST
request in Step 4:
{
  access_token: "1fcc97c90972bfb51780a9ab6dde13e9"
}
This access token is specific to our app, the particular store that was just authenticated, and the permission scope we created in Step 2. We can now use it to make requests to the Shopify API on behalf of the store owner.
Because this access token is permanent, we should store it somewhere (ideally securely in a database) so that we use it to make later API calls.
That’s the broad strokes of how the OAuth flow works. As I’ve hinted at in this post, if you’re using a common web programming language or framework, it’s very likely that you’ll be able to find existing libraries to help you avoid having to write too much code yourself.
Even so, or if you’re breaking new ground and writing the first Haskell-based Shopify app, hopefully this post has given you a solid understanding of how the flow works “under the hood”.